
In May this year at LDE the school invited all the students joining us in September to take part in a series of transition workshops. The classes are an opportunity for new students to see the school in action and familiarise themselves with their new environment. Subjects ranged from Science, Built Environment, Engineering, Virtual Reality, Product Design and even Maths. We don’t teach woodwork as such at the school, at least not in any way that would seem familiar to anyone over the age of maybe 40. Instead the craft is passed on via other routes where the focus is on the outcome rather than the material or methods used. There’s good and bad in this approach of course but that’s not the theme of this blog. Instead, and after a couple of requests via my Instagram account, what follows is a step by step guide for an hour long project that I used in the Transition classes aimed at recruiting the next generation of engineers in wood. It’s pretty basic stuff and intended for students age 13/14 without much experience of using simple geometry and hand tools to make things.
Step 1. Cut and prepare a piece of wood 225 x 45 x 6mm, preferably something lightweight and with nice straight grain running from tip to tip. Poplar, pine, sapele and even utile will work. Don’t sweat over the dimensions, a little over or under wont make much difference
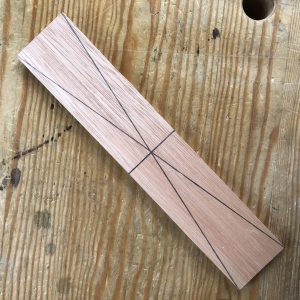
Step 2. Find the centre on the top face by drawing a line from corner to corner in both directions to form an X. Now use an engineer’s square to run a centre line around the piece of wood to the opposite face.
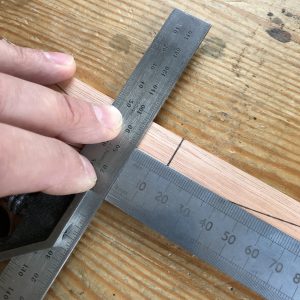
Step 3. Now using a zero end rule and the square draw lines 15mm either side of the centre line and transfer them to the other side of the piece of wood as before.
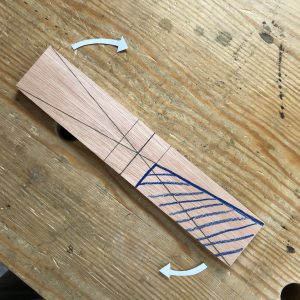
Step 4. With the piece of wood in front of you shade in the area outlined in the bottom right hand corner. Now rotate the piece of wood 180° (clockwise or anti-clockwise it doesn’t matter) while keeping it flat on the bench and shade in the new bottom right hand corner.
Step 5. Flip the piece of wood over (forwards or backwards, again it doesn’t matter) and repeat Step 4.
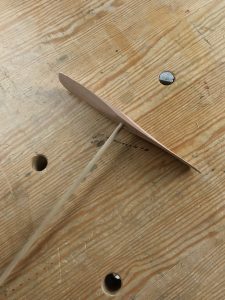
Step 6. Drill a 5.5mm dia hole in the middle of the piece of wood.
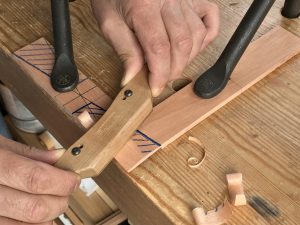
Step 7. Clamp the piece of wood close to the edge of the bench and use a spokeshave to remove material from the edge to a consistent thickness along the length of the shaded in area. Rotate the piece of wood 180° and repeat to the next shaded area.
Step 8. Flip the piece of wood over and complete Step 7 on the other face. Congratulations your piece of wood is now a propeller.
Step 9. Use a knife, a chisel or sand paper to round off the tips of the propeller.
Step 10. Cut a piece of 6mm dowel approximately 225mm long. Put a slight chamfer around one end and push it through the hole to complete your propeller.
Test flight and fine tuning.
Hold the propeller out in front of you with the dowel between your palms and spin the propeller gently by pushing your right hand away from you and your left hand back towards you. Allow it to spin freely without completely letting go. You should feel air being forced onto the top of your hands. If you can’t, you need to go back and refine the edges of the propeller. If you can, you’re ready for take off.
To improve performance extend the leading edges of the propeller into the centre section and maybe thin out the material in the middle of the propeller as well. When you’ve carried out all your test flights glue the dowel in place and head to the nearest open space.
.
Thank you Derek!
The grandchildren will love making them during the summer holidays when they visit.